Uploading Sony A7iii Pictures to Photoshop and Lightroom for Instagram
Our readers often inquire us if information technology is possible to go Lightroom to provide the same colors as one would see from camera-rendered JPEG files when shooting in RAW format. Many photographers often choose specific color profiles in their cameras and they get surprised when images are imported into Lightroom and all those changes are lost. You might have noticed when importing files that Lightroom changes the colors immediately after import, when the embedded JPEG files are re-rendered using Adobe's standard color profiles and settings. As a event, images might announced dull, lack contrast and have completely dissimilar colors. I have heard plenty of complaints on this effect for a while now, so I decided to post serial of manufactures for each major manufacturer on how to obtain more authentic colors in Lightroom that resemble the image preview seen on the camera LCD and in camera-rendered JPEG images. In this article, I volition talk about getting accurate colors from Sony DSLRs, SLTs and mirrorless cameras in Lightroom. Please run into our other manufactures on getting accurate colors for Nikon, Canon and Fuji cameras.
Due to the fact that Adobe'south RAW converters are unable to read proprietary RAW header data, some settings have to exist either practical manually or applied upon import. My personal preference is to utilize a preset while importing images, which saves me fourth dimension after. Before we go into Lightroom, let me get-go go over photographic camera settings and explain a few important things.
1) RAW File Nuances and Metadata
When shooting in RAW format, most camera settings similar White Balance, Sharpness, Saturation, Lens Corrections and Colour Profiles do not matter. Unless y'all use Sony-provided software like Epitome Data Converter, those custom settings are mostly discarded by third party applications, including Lightroom and Photoshop. Unfortunately, camera manufacturers rarely e'er publish full specifications for their RAW files and practice not work closely with third party awarding development companies like Adobe in order to take a full advantage of their cameras. Because of this, colour profiles, forth with all other camera settings are lost upon import of images. Although Adobe has been working hard on providing manufacturer and camera-specific color profiles, only the near pop cameras are typically covered. In addition, those colour profiles are generated in Adobe's own lab environment, which can result in slightly dissimilar color rendering when compared to the manufacturer'southward.
Let's get over data that is actually read by Lightroom / Photoshop Camera RAW:
- White Balance, every bit prepare by the camera. Instead of your chosen value such as Auto, Incandescent, Fluorescent, etc, but the actual color temperature and tint are read from the RAW file.
- Common image metadata such equally Capture Date/Time, Exposure, Focal Length, Flash, Photographic camera Make and Model, Lens information and GPS coordinates.
- Copyright information such equally Writer'southward Proper name, etc. (if it exists)
That's basically it. Now hither is the information that is completely discarded:
- Creative Style
- Color Space (only relevant for JPEG images and JPEG images embedded into RAW files)
- Dynamic Range Optimizer (DRO)
- Loftier ISO NR
- Face Detection
- Focus Area and focus point location in the frame
- AF Micro Adjustment and Lens Compensation (Shading, Chromatic Aberrations, Distortion)
- All other settings in the photographic camera menus
All of the above settings do not touch on RAW files in any fashion. Whatever you choose in your camera but gets written as header information to Sony's ARW files. Please note that "Long exposure NR" (Dissonance Reduction) is the merely setting that affects RAW files. However, Adobe volition withal not know if Long exposure racket reduction was turned on or off in your camera.
2) Camera Settings
Because the above settings do not affect your RAW files, they are essentially of no use, so I would recommend to go along them turned off past default. You might be wondering why JPEG images or the image on the back of the LCD change when yous pick unlike Creative Styles or other settings while shooting in RAW. That'southward because RAW files really incorporate full size JPEG previews, which is what your camera shows on the back of the LCD. Hence, any modify you lot brand in your camera volition only be reflected in the embedded JPEG file only. When RAW files are imported into Lightroom / Photographic camera RAW, the embedded JPEG file is discarded and a new one is generated, based on Adobe's default settings, or a chosen import preset. That's why when I talk about getting more authentic Sony colors in Lightroom, nosotros are simply trying to match Sony's default rendering of colors in JPEG images to those rendered by Lightroom or Photographic camera RAW. Remember, a RAW file is but like unprocessed motion picture – you can interpret and procedure colors any style you like.
However, changing camera settings can indirectly affect your RAW files. For example, if you accept Dynamic Range Optimizer (DRO) turned on (which merely applies a tone curve to the embedded JPEG paradigm), you might retrieve that you have enough shadow details in your prototype and you might terminate upwardly underexposing the paradigm. High ISO Speed NR might make it seem like you exercise not have much noise in your images, so you might non find that your ISO value is unnecessarily loftier. That's why it is best to plough all custom settings off completely.
Sony has a set of color profiles known as "Creative Style" bachelor in its cameras. Past default, a camera profile called "Standard" gets applied to images. That's the profile I typically use when shooting with Sony cameras. Whichever Creative Mode you choice, I would advise to stick to it if you desire to see consistent colors in Lightroom (or it will exist also much of a headache). And do not worry nearly modifying custom adjustments inside pic controls, since those might indirectly affect your RAW images as well (for example, setting high values for Dissimilarity, Saturation and Sharpness).
iii) Lightroom and Camera RAW: Camera Scale
Since photographers want to come across colors as rendered by their cameras, Adobe ended up creating different camera profiles based on the colors they saw from the rendered JPEG images. The process of creating such camera profiles is adequately complex and it involves shooting different color charts in JPEG format, and then trying to lucifer those colors while rendering RAW files. Adobe did an OK job with Sony's color profiles (although as demonstrated below, some colors exercise appear different) and re-created many of the most commonly used ones. For example, here is the total list of created profiles for the Sony A6000:
- Photographic camera Clear
- Camera Deep
- Camera Landscape
- Camera Lite
- Camera Neutral
- Camera Portrait
- Camera Standard
- Camera Brilliant
The ones that are missing for the A6000 are: Dusk, Dark Scene, Autumn Leaves, Black & White and Sepia. Since these profiles are rarely used and vary from camera to camera, I don't arraign Adobe for excluding them.
You can find the above-mentioned profiles under the "Camera Calibration" sub-module in Lightroom, or the "Camera Calibration" tab in Camera RAW, as seen below:
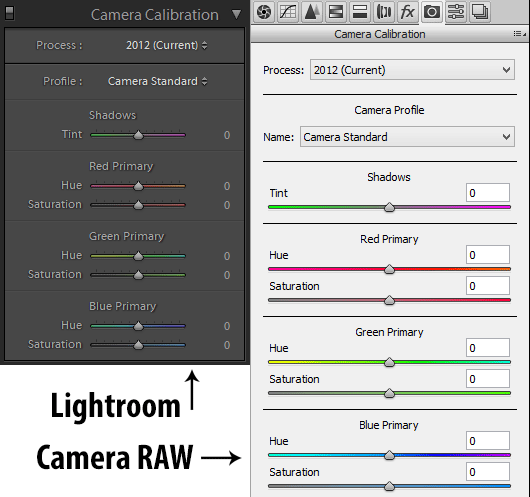
Basically, these try friction match the Creative Styles in your camera one to ane. If you set your camera Creative Style to "Standard", picking "Photographic camera Standard" from the Camera Calibration sub-module of Lightroom / Photographic camera RAW will imitate those colors (assuming that additional tweaking of Contrast and Saturation was not performed in the camera).
That's why it is a good idea to stick to i Creative Style in your camera, because you lot can prepare that same Camera Calibration contour to all images every fourth dimension y'all import them.
Adobe as well provides the ability to tweak individual colors for hue and saturation after applying a profile, simply if yous choose to practice that, it might deviate from Sony's original colors.
4) Applying a Camera Profile During Import
If you want to always have Sony'due south native colors in your images and non the default "Adobe Standard" photographic camera profile (which is often pretty wearisome), you might want to set up an import preset that gets applied to your images when they are imported into Lightroom. This is a very unproblematic and straightforward procedure, so let me prove you the best way to exercise it.
- Start, open whatsoever Sony RAW / ARW file in Lightroom's Develop Module.
- Keep White Residual under the "Bones" sub-module "As Shot", if you desire Lightroom to read what your camera gear up WB and Tint to.
- Scroll downwards to the Camera Calibration sub-module.
- Pick the same color profile as what you lot accept ready in your photographic camera (for instance, Photographic camera Standard).
- On the left console, ringlet down to the "Presets" sub-module and printing the "+" sign next to it, which is used for creating a new preset.
- A new window volition pop-upwardly. Give the preset a name, for example "Sony Import Preset". The default folder "User Presets" is fine, merely you tin create a different folder if y'all want to.
- Only select "White Residual", "Process Version" and "Calibration", then click "Create", equally shown beneath:
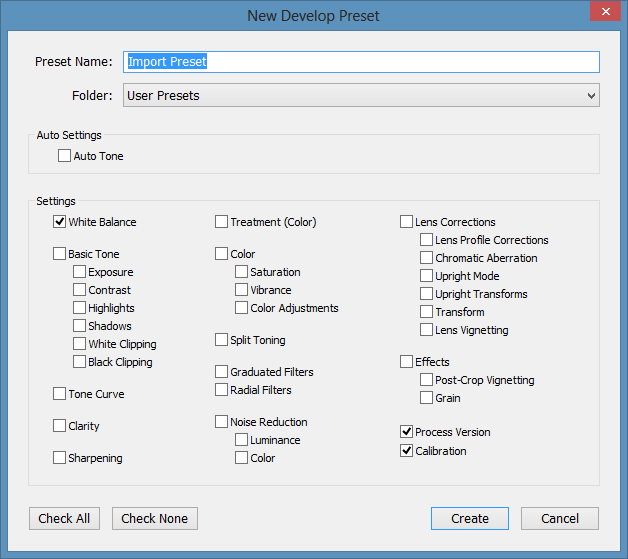
Once you practise this, a new preset will appear in the Preset menu, nether the specified folder. Now all y'all need to practice is specify this preset when importing images. Bring up the Import Window, then look at the right side of the window and expand "Apply During Import". Click the "Develop Settings" drop-down and pick the newly created import preset, as shown below:
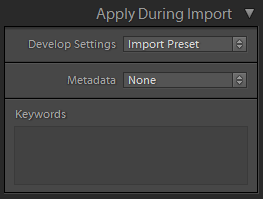
Once you lot import the photos, every i of them will exist automatically inverse to the previously selected camera profile, which volition match whatever you picked in your camera.
5) Adobe Photographic camera Profiles vs Sony Creative Way
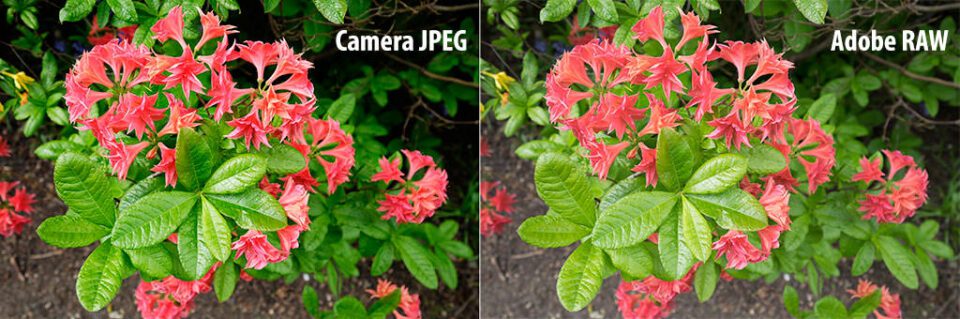
At present permit's have a look at a photo and see how closely Adobe'south Camera Profiles lucifer Sony's Artistic Styles. I did a quick experiment, setting the Sony A6000 to "Vivid" Artistic Way, and then taking a picture of flowers. I set the camera'due south file format to RAW + JPEG, so that I could use the JPEG file as a reference. Hither is the JPEG file that the camera captured:

And hither is what the image looked like after I practical the "Camera Vivid" profile in Lightroom:
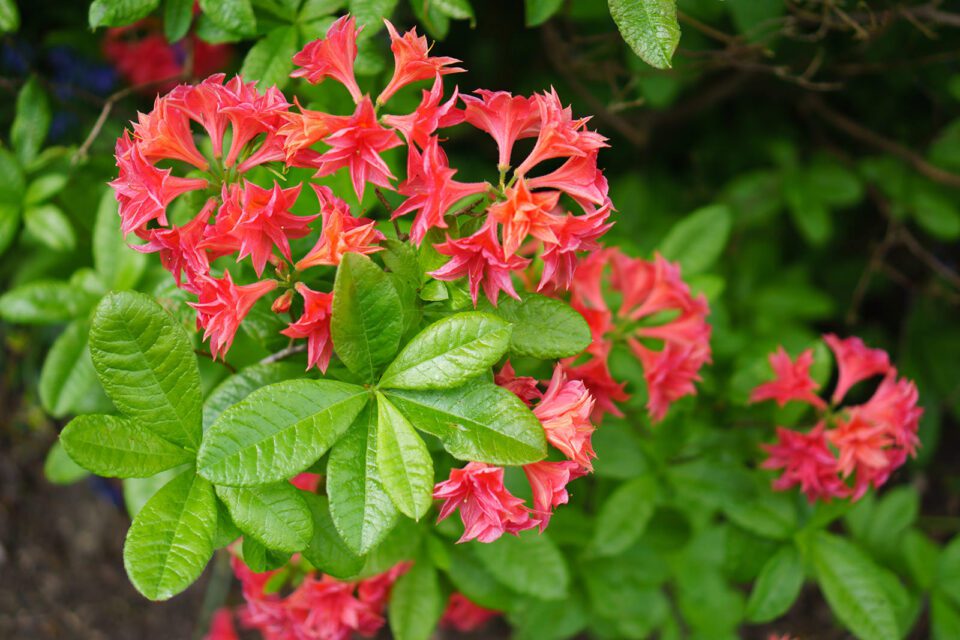
As you can meet, the images are quite different. While there are some noticeable differences in rendered colors, information technology is pretty clear that Adobe does not utilise enough dissimilarity to its Brilliant camera profile. As a consequence, the two images appear rather dissimilar.
When I manually applied "Medium" contrast on the curve in Lightroom, the image started to wait quite similar in the shadow area:

I cannot say that I was able to reproduce the colors exactly, but it is fairly shut and is a expert outset.
Hence, if I were to employ the "Vivid" artistic manner in the Sony A6000, I would include Medium Contrast along with the Camera Vivid camera profile in my import profile to exist able to match the two. I guess the championship of the commodity does non reverberate the reality, as the colors and tones are however noticeably off. Still, it is not as far off as the Adobe Standard profile either…
Source: https://photographylife.com/how-to-get-accurate-sony-colors-in-lightroom
0 Response to "Uploading Sony A7iii Pictures to Photoshop and Lightroom for Instagram"
ارسال یک نظر